6. User-Interface
This chapter gives the description of various building blocks of the user-interface and phylogenetic-tree editor, sequence data presentation, context-sensitive help, and multiple-file editor and browser. In the following discussion we refer to many standard special keys, such as function keys F1 to F10 and Alt, Esc, Tab, Shift, Ctrl, and Enter keys. If you are not familiar with these keys, please locate them on your keyboard before proceeding further.
6.1 Screen
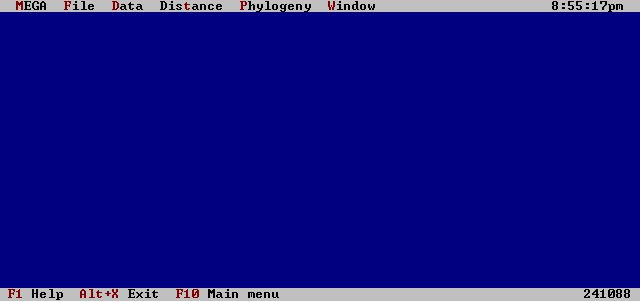
The computer monitor is the screen. It has three components in MEGA (Fig. 6.1) the menubar at the top, the status line on the bottom, and the desktop window in the middle. A clock follows the menubar on the top-right corner and the heap view that displays the amount of computer memory available for analysis is displayed directly
below this clock. The rest of the bottom line to the left of the heap view is the status line.
 |
| Fig. 6.1 General desktop pattern |
6.1.1 Menubar, Desktop, and Status Line
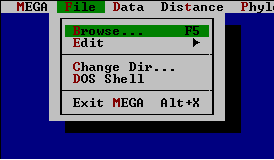
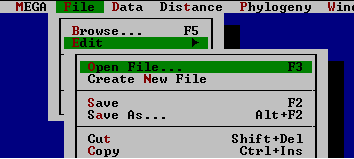
The main menu (menubar) appears at the top of the screen and has six pulldown menus. Every menu contains a list of commands (Fig. 6.2). If a command is followed by an ellipsis (...), its selection displays a dialog box. If an triangle appears after a command, then a submenu is displayed. Commands without any ellipsis (...) or triangle
indicate that some action will follow subsequent to their selection. The menus and the commands can be chosen with the keyboard as well as with the mouse.
| Keyboard | Function key F10 activates the menubar. A sliding bar that moves back and forth with arrow keys will appear. A menu with highlighted bar can be selected by pressing Enter. Pressing Alt + highlighted letter of the menu also shows the corresponding menu.
|
| Mouse |
The left mouse button is for clicking and dragging, unless the right mouse button is chosen from the mouse control panel. Click on the menubar to display the desired menu.
|
 |
 |
| Fig. 6.2 A typical pull-down menu (left) and submenu (right) |
Enabled and
Disabled
Commands |
Enabled commands are displayed in bright shade and color, and one of the character from the command name is highlighted. Disabled commands are not selectable and appear in light shade of gray. Highlighting and gray shading may not be visible on old monochrome monitors, and the only way to know that the command is enabled is to try and select it.
|
The region between the menubar and the status line is the desktop. Desktop is a window without any borders. All the windows (file-editor, file-browser, data presentation, etc.) are displayed on this desktop.
A dynamic status line is given at the bottom of the screen. It provides hints, short-cuts, and additional options. Short-cut commands are activated either by clicking with a mouse or by pressing the highlighted letter of the command name. One line hint on menu commands and dialog box items is also available on the status line.
6.1.2 Hot-Keys and Short-Cuts
Many frequently used commands can be activated by pressing hot-keys (e.g., hot-key for help is F1). These hot-keys produce an action only if the corresponding command is enabled. Some hot-keys are shown with a ' + ' sign between them to indicate that these keys should be pressed simultaneously.
-
Table 6.1 General hot-keys
| Key(s) | Menu item | Function |
|---|
| F1 | (none) | Display context-sensitive help. |
| Alt + F1 | MEGA|Using Help | How to use help. |
| F2 | File|Edit|Save | Save current file. |
| Alt + F2 | File|Edit|Save As | Save current file as another file. |
| F3 | File|Open File | Open a file for editing. |
| Alt + F3 | Windows|Close | Close current file and quits. |
| F4 | Data|Data Presentation | Display sequence data.
|
| Alt + F4 | Data|Close Data | Close active data file. |
| F5 | File|Browse | Open text-file for viewing only. |
| F6 | Window|Next | Go to next window. |
| Alt + F6 | Window|Previous | Go to previous window. |
| F7 | Distance|Compute Distances | Compute pairwise distances. |
| Alt + F7 | Phylogeny|Std. Error Test | Conduct branch length test.
|
| F8 | Phylogeny|Construct Tree(s) | Construct phylogenetic tree(s). |
| Alt + F8 | Phylogeny|Bootstrap Test | Conduct bootstrap test on phylogenies. |
| F9 | Window|Zoom | Expand the current window. |
| Alt + F9 | Window|Re-size/Move | Re-size or move the window.
|
| F10 | (none) | Go to menubar. |
Table 6.2 Main menu hot-keys
| Key(s) | Item | Function |
|---|
| Alt + M | MEGA menu | Takes you to MEGA menu. |
| Alt + F | File menu | Takes you to File menu. |
| Alt + D | Data menu | Takes you to Data menu.
|
| Alt + T | Distance menu | Takes you to Distance menu. |
| Alt + P | Phylogeny menu | Takes you to Phylogeny menu. |
| Alt + W | Window menu | Takes you to Window menu. |
| Alt + X | File|Exit MEGA | Exit MEGA to end the session.
|
Table 6.3 Windows hot-keys
| Key(s) | Menu item | Function |
| Alt + F3 | Window|Close | Close the currently active window. |
| F6 | Window|Next | Go to next window. |
| Alt + F6 | Window|Previous | Go to previous window. |
| F9 | Window|Zoom | Expand the current window. |
| Alt + F9 | Window|Re-size/Move | Re-size and move the current window. |
6.2 Windows and Dialog Boxes
A window is a rectangular area on the screen that may have a frame. Some windows can be opened, closed, re-sized, or overlapped (e.g., file editor window; Fig. 6.3), whereas others are frameless and cannot be re-sized (e.g., dialog boxes).
If many overlapping windows are opened at the same time, the active window is on the top with a double line border. On the top border of this frame exist a close box icon on the left, a title bar in the center, and a zoom icon on the right corner. The re-size corner is located at the bottom-right corner at the intersection of horizontal and vertical scroll bars.
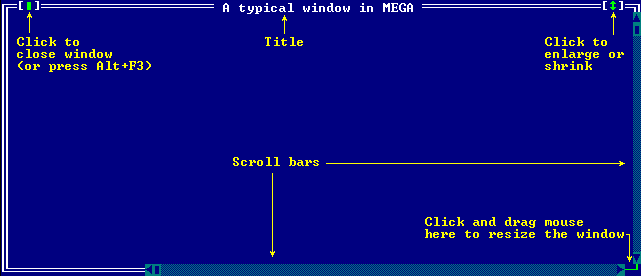 |
| Fig. 6.3 A typical window |
Dialog boxes are used to select various options at different stages of analysis. Up to five kinds of elements may comprise a dialog box: action- and radio-buttons; and check-, input-, and list-boxes. Dialog boxes cannot be re-sized, but they can be moved around on the screen. In a dialog box, the Esc key aborts the analysis, and the Enter key is pressed to accept all displayed options and initiate subsequent actions. Key that provide movement between different groups and within groups themselves are listed in Table 6.4.
-
Table 6.4 Dialog box keys
| Key(s) | Description |
|---|
| , ¯,
®, ¬ | Move within options in a group. |
| Tab | Cycle through the groups in clockwise direction. |
| Shift + Tab | Cycle through groups counter-clockwise. |
| Enter | Select all the setting and proceed. |
| Esc | Cancel the box (no action follows). |
| Space bar | Select/un-select a check box. |
| Alt + Letter | Select the button with that highlighted letter. |
 |
| Fig. 6.4 A dialog box |
|---|
| Action-buttons |
In Fig. 6.4, OK and Cancel are the action-buttons. In a dialog box, you may find many such buttons (e.g., the Preview button in the Print Tree dialog box). Using these action buttons, you issue commands. In every dialog box, there is a default action button that is tied to the Enter key. Whenever you press Enter, the action associated with the default button will occur. Usually the OK button is a default button. The OK button is used to accept all options selected in the dialog box. You can also issue the OK command by either pressing Alt + O or clicking on it. Clicking on Cancel will abort any further action. The Enter and Esc keys are short-cuts for the OK and Cancel commands.
|
| Radio-buttons |
Radio-buttons have round parentheses ( ) before them. Presence of a dot in the parentheses, ( · ), indicates that the radio-button is selected. Only one radio-button can be selected at any time. Related radio-buttons are clustered in a group and are listed under a common label. The Up ( ) and Down ( ¯ ) arrow keys provide movement within groups of radio buttons. You may also click on a radio-button to select it. (If you have a monochrome monitor, the focussed check-box is indicated by the chevron symbol, ».) |
| Check-boxes |
Check-boxes have square brackets [ ] before them. An X in the square brackets, [X], indicates that the check-box is selected, and many check-boxes may be selected at one time. Many related check-boxes are clustered in a group and are listed under a common label. The Up ( ) and Down ( ¯ ) arrow keys provide movement within such groups. (If you have a monochrome monitor, the focussed check-box is indicated by the chevron symbol, ».) To unselect a check box, click with the mouse or press Space bar on it. |
| Input-boxes |
An input box allows the user to type-in text. Most of the editing keys (Home, End, , ¯, ®, ¬, Delete, etc.) work in these input boxes. If the line displayed on the screen is not long enough to show all the text, the arrowheads appear at the end of the line. Some input boxes have a down arrow icon at their right-end indicating an associated history list. The input file name box is one such box. Pressing down arrow key ( ¯ ) in the input box opens the history list with all the text strings that were entered at the input line before. Use arrow keys to move in this list and select any line of text by pressing the Enter key. Press Esc to come out of the history list without making any selection. |
| List-boxes |
In a list box, a list of variable-length strings is displayed that can be scrolled by using arrow keys and selected by pressing Enter. List boxes may contain lists in more than one columns (e.g., file list box in Input file name dialog box). |
6.3 File Name Dialog Box
Files to be edited, browsed, or analyzed are specified in the File Name dialog box. It contains an input box, a file list, a file information panel, Cancel and Open buttons, and a history list attached to the Name input box. Movement between different elements in this dialog box is provided with Tab and Shift + Tab keys.
The name of the file to be opened or loaded (or the file-name mask to be used as a filter for the files list box, for example, *.*) is entered in the Name input box. A history list, [ ¯ ], is attached to this box that retains all the file names typed in the Name box before. The File list box shows the names of all the files in current directory that match the file-name mask in the Name input box. Present below the list box is a file information panel that displays the path name, file name, date, time, and size of the selected file.
The Open button selects the current file for use; Cancel rejects the current file but does not aborts the current operation. Esc cancels the dialog box.
6.4 Context-Sensitive Help Box
The on-line context-sensitive help is invoked with the F1 key. It brings up a Help dialog box (Fig. 6.5) that instantly displays the relevant information about the current command or option.
 |
| Fig. 6.5 Context-sensitive help box |
|---|
In this help window, two kinds of information are present:
| Help text |
Help for the current item is written like a text file. Simple cursor movement keys help navigation in the window. Vertical and horizontal scroll bars can be used if the mouse is installed on the system. |
| Additional help |
Some words are highlighted in the help window indicating that further help is available. This cross-reference help is selected by pressing the Tab key to get to the desired highlighted word and then by pressing Enter. (If you're using a mouse, click on the highlighted word to retrieve further information.) |
-
Table 6.5 Help box keys
| Key(s) | Description |
|---|
| , ¯,
®, ¬, PgUp/PgDn |
Movement in the box. |
| Tab | Cycle through cross-reference help clockwise. |
| Shift + Tab | Cycle through cross-reference help counter-clockwise. |
| Enter | Open cross-reference help.
|
| Esc | Exit help.
|
6.5 Text-File Browser
Selection of the file browsing option (with F5 or File|Browse command) brings up a File Name box that prompts for the file to be opened. The selected file is displayed in the read-only mode. Any number of files can be opened at the same time for browsing depending on the memory size of the computer. Maximum characters per line in the file browser is 1023.
-
| Key(s) | Response |
|---|
| F5 | Open file for browsing. |
| , ¯ | Move up/down one line. |
| ®, ¬ | Move right/left one column. |
| PgDn/PgUp | Move one page down/up. |
| Home | View left most column. |
| End | View right most column. |
| Ctrl + PgUp | View top of file. |
| Ctrl + PgDn | View bottom of file. |
| Alt + F3 | Close the current file window.
|
6.6 Text-File Editor
A simple text-editor is included in MEGA. Many files can be edited simultaneously in this editor. It is provided for revising output files and editing small data files (up to 32KB). In this editor, the functions for saving edited files, transferring and copying blocks, and finding and replacing text strings are available. Editor shows only up to 256 characters in any line.
 |
| Fig. 6.6 Editor options menu |
|---|
| File commands | An existing file is opened for editing with the File|Edit|Open File command (F3). The File Name input box inquires about the file name. (New files can be created with the File|Edit|New File command.) Once a file is opened, its contents can be edited and then saved with the Save and Save As commands from the File|Edit menu. Files can be closed either with Alt + F3 or by clicking on the upper-left close icon of its window. |
|
| Key(s) | Command |
|---|
| F3 | Open an existing file to edit. |
| Alt + F3 | Close and quit edited file. |
| F2 | Save edited file, do not exit. |
| Alt + F2 | Save file as different file, (do not exit). |
|
| Cursor commands |
Standard cursor movement keys such as /¯, ¬/®, PgUp/PgDn, and
Home/End, have normal meaning in this editor. The Ctrl key, when used
in conjunction with any of these keys, accelerates the movement of the cursor in the file. For example, Ctrl + PgDn travels to the end of the file, whereas PgDn travels ahead by one page only. Similarly, the character right key, ®, when coupled with the Ctrl key moves to the next word instead of the next character . |
| Cursor
movement Keys |
| Key(s) | Command |
|---|
| ¬/® | Character left/right. |
| Ctrl + ¬/® | Word left/right. |
| /¯ | Line up/down. |
| Home | Beginning of the line. |
| End | End of line. |
| PgUp/PgDn | Previous/next page. |
| Ctrl + PgUp | Top of the file. |
| Ctrl + PgDn | End of file. |
|
| Text editing commands | Text is entered in the file in two modes: insert and typeover. The Ins key alternates this mode. The cursor is blocked in the typeover mode, whereas in the insert mode it is more like an underscore . A list of commands for deleting characters, words, and lines is given below. |
|
| Key(s) | Command |
|---|
| Del | Delete current character. |
| Back space | Delete previous character. |
| Ctrl + Y | Delete current line. |
| Ctrl + Q Y | Delete to the end of the line. |
| Ctrl + T | Delete current word. |
| Ins | Insert mode on/off. |
|
| Block commands | A block of text is any continuous text, from a single character to hundreds of lines, that is selected (highlighted) on the screen. At any time, only one block may be selected in a file. Blocks may be marked with the keyboard or with the mouse. |
| - Selecting text by using keyboard:
- Hold the Shift key down (keep pressed), and press one of the keys that moves the cursor; the text starts becoming highlighted.
- Selecting te~ by using mouse:
- Click and hold the mouse button at the place of the origin of the text to be marked and drag it to the end of the text to be selected holding the mouse down.
|
| Mark block commands |
| Key(s) | Command |
|---|
| Shift + ¬/® | Left/right one character. |
| Shift + /¯ | Same column on previous/next line. |
| Shift + End | End of line. |
| Shift + Home | Beginning of line. |
| Shift + PgUp/PgDn | One page up/down. |
| Shift + Ctrl + ¬/® | Left/right one word. |
| Shift + Ctrl + PgDn | End of file. |
| Shift + Ctrl + PgUp | Beginning of file. |
|
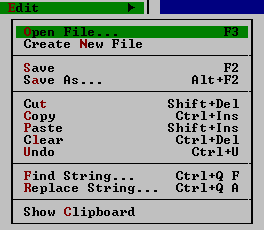
| Block-text manipulation | As soon as some text is marked, the block manipulation commands in the File|Edit menu become available. Marked blocks of text can be deleted, moved, and copied to the same file or to other opened files for editing. |
| All block transfers use a special window called the clipboard. In fact, the clipboard is an edit window that is hidden from the user. The contents of the clipboard can be examined with the File|Edit|Show Clipboard command. For any block-transfer operation, the text-block is first stored in the clipboard. For example, whenever any text-block is to be copied, it is first marked as a block and then copied to the clipboard with command File|Edit|Copy. This text may be pasted (retrieved) in any file with the File|Edit|Paste command. There are short-cuts for these operations that are
explained below. |
| Copy a block | - Ctrl + Ins, and then Shift + Ins
- Ctrl + Ins copies the selected block to the clipboard. Position the
cursor where you want to insert the text and then press Shift + Ins to
paste the text-block there.
|
| Copy text | - Ctrl + Ins
- Copies the selected text to the clipboard.
|
| Cut text | - Shift + Del
- Copies the selected text to the clipboard and deletes it from the file.
|
| Clear block | - Ctrl + Del
- Deletes a block from the file. It can not be recovered.
|
| Move a block | - Shift + Del, and then Shift + Ins
- Shift + Del copies the selected text to the clipboard and removes it from the current position. Position the cursor where you want the text to be moved and press Shift + Ins to copy the block from the clipboard to that position.
|
| Paste from clipboard | - Shift + Ins
- It copies the contents of the clipboard to the current cursor position.
|
| Text Search Commands | The text-search and text-search-and-replace commands are used for searching and replacing patterns of characters. These commands search for the desired string of characters, with case-sensitive and whole-word-only options, from the current position of the cursor till its first occurrence. In the text-search-and-replace command, Replace String, the string to be searched and the replacement string can be specified. All occurrences of the search string may be replaced with/without confirmation. |
|
| Key(s) | Commands |
|---|
| Ctrl + Q F | Find a text string. |
| Ctrl + Q A | Find and replace a text string. |
|
6.7 Sequence Data Presentation
Selection of the Data|Data Presentation command displays the currently used sequence data on the screen in the "Current Data" window. In this window, nucleotide sequences can be translated into amino acid sequences, and both can be displayed on the screen. They can be written in files for PAUP (Swofford, 1993), PHYLIP (Felsenstein, 1993), and other formats. The variable, parsimony-informative and two- and fourfold redundant sites can be highlighted on the screen. In addition, this window contains a command for computation of various statistical quantities for molecular data (see chapter 3).
The "Current Data" window (Fig. 6.7) contains three elements: a list of command buttons on the upper-left corner, the sequence data in the middle, and four dynamic views (OTU Label, Site#, Total Sites, and Marked Sites) that show the current position of the cursor and display other important attributes. The command buttons at the top of the window provide all the options (Table 6.7). These buttons are toggles and their effects are reversible. Inapplicable buttons at any stage are automatically disabled.
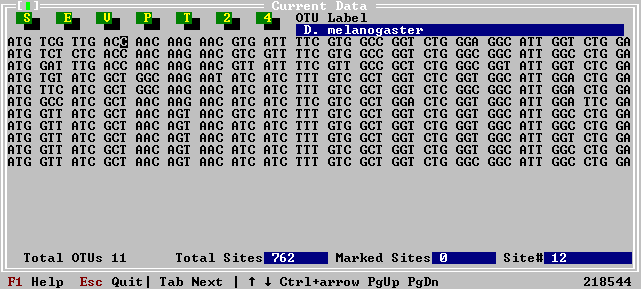 |
| Fig 6.7 Sequence Data Presentation window |
|---|
- Table 6.6 Cursor movement keys
| Key(s) | Description |
|---|
| /¯ | Go to previous/next sequence. |
| ¬/® | Go to previous/next site. |
| Ctrl + ¬/® | Go to previous/next cluster of sites. |
| PgUp/PgDn | Go to previous/next screen of sequences. |
| Home | Go to top left corner of the screen. |
| Home, Home | Go to first site in the first sequence. |
| End | Go to bottom right corner of screen. |
| End, End | Go to the last site in the last sequence. |
| Tab | Cycle forward in the data display window. |
| Shift + Tab | Cycle backward in the data display window. |
| Esc | Quit data display. |
- Table 6.7 Data display commands
| Key | Command | Description |
|---|
| V | Variable | Highlight all variable sites. The number of variable sites is shown in the Marked Sites display. |
| P | Parsimony-informative | Highlight all parsimony-informative sites. The number of these sites is shown in the Marked Sites view. |
| T | Translate | Translate protein-coding nucleotide sequences. Presence of '*' indicates a stop codon. The number of amino acids is shown in the Total Sites view. Make sure that the correct genetic code table is used. |
| 2 | Twofold | Highlight all common twofold redundant sites in protein-coding nucleotide sequences. Their number is displayed in the Marked Sites view. Make sure that the appropriate genetic code table is used. |
| 4 | Fourfold | Highlight all common fourfold redundant sites in protein-coding nucleotide sequences. Their number is displayed in the Marked Sites view. Make sure that the appropriate genetic code table is
used. |
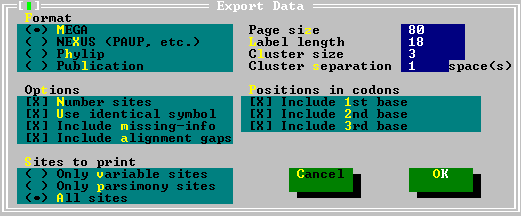
| S | Statistics | Compute various statistical quantities for the sequences (see chapter 3). |
| E | Export | Write sequence data (and its subsets) to files in MEGA NEXUS (PAUP, etc.), PHYLIP, and publication formats. A dialog box prompts for various options that determine the layout of the
output data file. For information on individual options press F1 in the dialog box.
|
- Table 6.8 Cursor navigation keys
| Keys(s) | View mode | Edit mode |
|---|
| /¯ | Go up/down one row. | Go to upper/lower descendant. |
| ¬ | Go left one column. | Go to the ancestor. |
| ® | Go right one column. | Go to lower descendant. |
| Shift + ¬ | Go left fast. | Scroll screen to left. |
| Shift + ® | Go right fast. | Scroll screen to right. |
| Shift + | Go to previous page. | Scroll screen up. |
| Shift + ¯ | Go to next page. | Scroll screen down. |
| PgUp | Go to previous page. | Go to sister branch. |
| PgDn | Go to next page. | Go to sister branch. |
| Home | Go to upper left corner of the tree. | Go to the left most branch on the tree. |
| End | Go to lower right corner of the tree. | |
| Esc | Quit tree display. | Exit tree display. |
| F1 | Help on view mode. | Help on edit mode. |
6.8 Phylogenetic-Tree Editor
The phylogenetic-tree editor displays the trees constructed using the Construct Tree(s), Bootstrap Test, and Standard Error Test commands from the Phylogeny menu. It facilitates root relocation, tree re-sizing, and branch flipping and swapping on the screen. The edited tree can be stored in text- or graphics-files, printed as graphic images on a wide range of printers, and previewed in the graphic mode on the screen with the EGA, VGA, and Hercules graphics adapters.
In this editor, the tree is displayed on the screen with approximate branch lengths because computer screens are only 80 columns wide. The accuracy of branch lengths displayed can be improved by re-sizing the tree with the Expand command. An expanded tree is spread beyond the margins of the screen.
By default, a tree is displayed in the view mode where the tree is presented like a text-file. You can invoke the tree-editing mode by pressing the E key. A blocked cursor will appear at the left side of the screen. This cursor can be moved with cursor movement keys (Table 6.8). The branch where the cursor is resting is referred to as the focused branch and tree-editing commands can be used. In the edit mode branches can be swapped and flipped, and the tree can be re-rooted. The cut and paste operations are not allowed in this editor because they alter the reconstructed branching pattern.
-
Table 6.9 Commands and effects
| Command | Key | Description |
|---|
| Edit | E | Change to edit/view mode. |
| Print | P | Print tree. |
| Topology | T | Display branching pattern only. |
| Cut-Off | O | Use a cut-off level and display branching pattern only. |
| Contract | C/- | Reduces the size of an expanded tree. |
| Expand | X/+ | Magnifies the tree. |
| Mirror | M | Displays mirror image of the complete tree. |
| Root | R | Roots the tree on focused branch. |
| Flip | F | Display mirror image of a sub-tree. |
| Swap | S | Swap the descendent branches. |
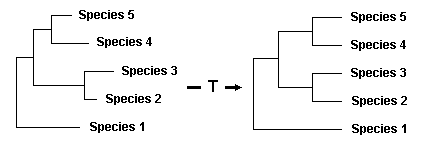
| Topology |
By default, MEGA displays a tree using the branch length estimates, if available. Using the Topology command, you can display this tree without any branch lengths. To return back to the original tree, press 'T' again. |
|
 |
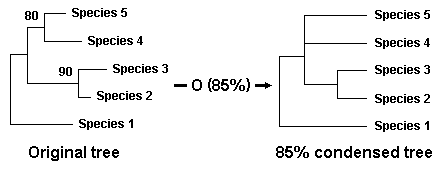
| Cut-Off |
The Cut-off command is available whenever branch length estimates and additional information such as BCL or CP are available for the displayed NJ or UPGMA tree. In this case, the cut-off command can be used to collapse branches that have BCL (or CP) values smaller than the specified cut-off level. Only the branching pattern of the collapsed or condensed tree is displayed on the screen. Note that this condensed tree is not a consensus tree. To return back to the original tree, press 'O' again. |
|
 |
|
The Cut-off command is also available if two or more MP trees are produced. In this case, this command provides a way of constructing consensus trees. To begin with, a majority-rule (>50% frequency) consensus tree is displayed. Using the cut-off command, you can construct majority-rule consensus trees at any level >50%. |
| Root |
Trees can be re-rooted for neighbor-joining and maximum parsimony trees only. To relocate the root, position the blocked cursor with the cursor navigation keys on the desired branch and press 'R'. The tree is re-rooted instantly. If the cursor is positioned on a branch that immediately follows the root, its branch length is reduced by half, and the length of its sister branch increases appropriately. |
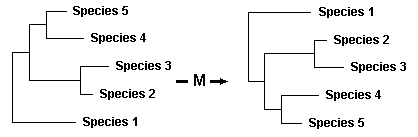
| Mirror |
It has a mirror like effect on the tree. The tree is drawn such that the OTUs previously on the top goes to the bottom, and the one at the bottom jumps to the top. |
|
 |
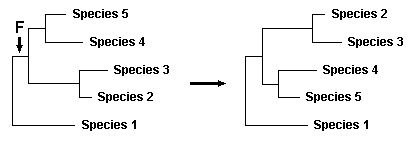
| Flip |
This command has a mirror like effect on part of the tree, i.e., the right-hand side of the focused branch. |
|
 |
| Swap |
It swaps the position of two descendant branches of the focused branch. The structures of the sub-trees hinged on the descendant branches remain unaffected. |
|
 |
6.9 Printing Trees
MEGA provides the printing of phylogenetic trees in graphics and text formats from the phylogenetic tree editor. These trees can be printed on various dot matrix, laser, PaintJet, and PostScript printers and saved in graphics and text files. The trees can be previewed on the screen before printing if a graphics adapter is available. The options available in the tree printing function are described below.
| Output devices |
Printers, files, and the computer monitors are all output devices. MEGA allows you to output the tree to any of these devices in graphics and text formats.
- Printers
- MEGA supports most of the popular printers. A list of these printers is provided in the Appendix D (only in the printed manual). Even if your printer is not given in this list, it may still be supported. Most printers emulate one of the industry standard printers. Some printers require special DIP switch settings in order to provide emulation, while others automatically perform emulation. Refer to you printer documentation for specific emulation instructions.
- Text Files
- In this option the phylogenetic tree is written as an ASCII text-file. The branch lengths on this tree are only approximate, and this tree is a true copy of the tree shown on the screen. This text file can be imported in word processors such as WordPerfect for printing and modification.
- Graphics Screen
- The graphic image of the tree shown on the screen in the text mode can be visualized with the Preview command. This command works only when you have a graphics adaptor.
|
| Size |
The size of the output tree can be altered by adjusting the size of the page, the number of OTUs per page, and the orientation of the page.
- Page size
- Page size specifies the portion of the page to use for printing. The valid options are Full, Half, and Quarter page.
- Number of OTUs per page
- This command provides a way to print trees in multiple pages. You cannot print less than 5 OTUs per page. Example: If your tree contains 10 OTUs and you ask for 20 OTUs per page, this command will produce a tree in half a page.
- Orientation
- Page orientation specifies the layout of the page as Landscape or Portrait. By default, the Portrait orientation is chosen.
|
| Style |
You can select fonts, printing resolution, etc. to modify your printouts.
- Fonts
- One of the three fonts can be selected for printing. These fonts are Small, Simplex, and Script.
- Resolution
- The graphics resolution depends on the printer that you use. MEGA provides three resolutions: low, medium, and high. Not all printers have all these resolutions. If you specify a resolution that exceeds your printer's capability, printing will be done using the highest resolution available. You should refrain from using the high option because they print rather slowly.
- OTU Alignment
- With this command, you can place all OTU labels on the right-hand side of the tree. By default, all the labels are written immediately after the corresponding exterior branch.
- Scale bar
- With this command a scale bar can be written at the end of the printed tree.
- Writing information
- Using these options, you can print branch lengths, BCL, or CP values on the tree. If the selected option is not applicable, it is ignored at the time of printing.
- Legend
- With this option, a legend can be appended to the tree printed. The legend cannot be longer than 80 characters. On the printed tree, the legend will be truncated if the font size is not small enough to accommodate all the 80 characters.
|
[Next] [Table of Contents]